Norwegian Crispbread – Seed Crackers (Vegan & Gluten-Free)

20 Minute Meals, Appetizer, Dairy-Free, Gluten-Free, Nut-Free, Snack, Soy-Free, Vegan

A taste of Norway.

I first tried Norwegian crispbread (knekkebrød) in Bergen, Norway. I was hooked. In my quest to find gluten-free food, I chose the one item at the bakery that spelled out “glutenfritt.” I went back the very next day to buy two more bags. Thus, my relationship with knekkebrød was born.

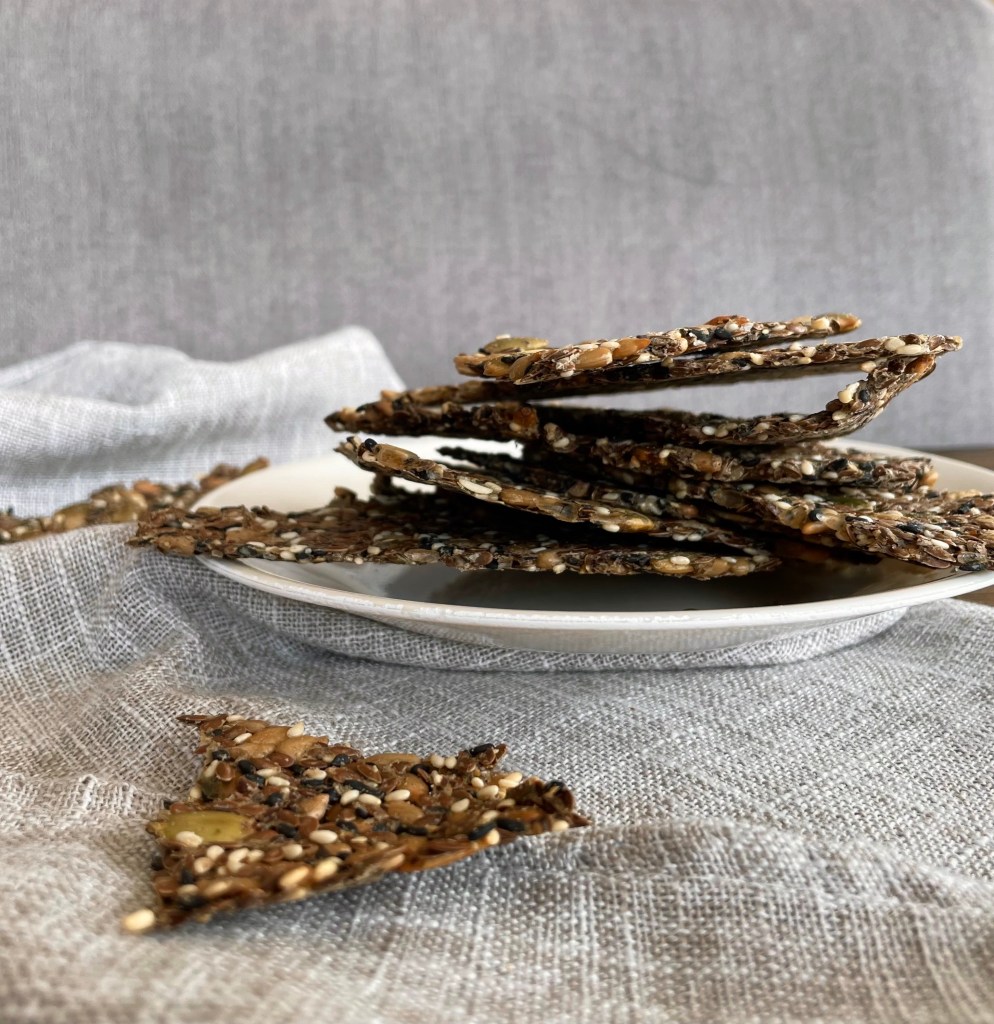
Everything about it is addicting. It’s crispy and crunchy, and the flavor of toasted sesame and flaxseeds recalls that of some childhood snack… Whatever it is, it’s delicious. When I returned to the States, I decided to recreate it. While I’m sure I’m butchering the traditional Norwegian recipe, I hope it holds up as my homage to my time in Norway. Enjoy!

Prep Time: 15 minutes
Cook Time: 15-18 minutes
Serves: 10 large crackers

Ingredients

Dry:

  • 3 tbs. flaxseeds
  • 2 tbs. sunflower seeds
  • 2 tbs. sesame seeds (I mixed white and black sesame seeds)
  • 1 tbs. pepitas
  • 1 tbs. ground flaxseed
  • 1 tbs. brown rice flour
  • 1/4-1/2 tsp. salt

Wet:

  • 1/4 + 1/8 cup boiling water

Recipe

  1. Preheat oven to 350° Fahrenheit (convection bake). Line a medium or large baking sheet with parchment paper.
  2. In a medium bowl, mix together dry ingredients. Pour over boiling water and mix. Cover mixture with a towel and let sit for 10 minutes to allow the seeds to absorb the water.
  3. Using an offset spatula, spread the mixture onto the parchment paper. Spread as thinly as possible (2-4 millimeters thick).
  4. Bake for 15-18 minutes or until dry and crispy. Let cool completely before breaking into large pieces.

Processing…
Success! You're on the list.

Hummus Avocado Toast (Vegan & Gluten-Free)

20 Minute Meals, Breakfast, Dairy-Free, Entree, Gluten-Free, Nut-Free, Snack, Soy-Free, Vegan

Avocado Toast walked so Hummus Avocado Toast could run.

You’ve tasted avocado toast, avocado toast with egg, avocado toast with smoked salmon… Forget it all, because this hummus avocado toast just blew everything out of the water. On my recent tour of Europe, I sampled toasts from five different countries. Each had different things going for them–avocado mousse in Spain, seed bread in Italy, hummus toast in France–so I decided to pick out my favorite elements and combine them into one single toast. Enter: hummus avocado toast.

Let me paint a picture for your taste buds. You take your first bite, and as you bite into that crispy, toasted bread, the tangy, nutty hummus blasts you with flavor. That happens at the exact moment you get the fresh creaminess of avocado, earthy touch of cilantro, sweet burst of tomato, and subtle crunch of sunflower seeds.

The best part of this recipe is the ease of substituting and adjusting ingredients. Don’t have flax seeds? Swap for pumpkin seeds. Hate cilantro? Leave it out. Want more hummus? Heap on some more. Make it your own!

Prep Time: 5-10 minutes
Serves: 2 toasts

Ingredients

  • 2 slices of bread (I use Udi’s gluten-free Whole Grain Sandwich Bread)
  • 2 tbs. hummus (adjust to taste)
  • 1/2 avocado
  • 4 cherry tomatoes
  • 1 tsp. sunflower seeds (adjust to taste)
  • 1/4-1/2 tsp. flax seeds (adjust to taste)
  • Squeeze of lemon juice
  • Pinch of salt
  • Pinch of black pepper
  • Optional: few sprigs of cilantro

Recipe

  1. Toast bread. Slice avocado lengthwise into thin strips. Cut tomatoes in half.
  2. Spread 1 tbs. hummus onto each slice of toast, then place half the avocado slices onto each slice. Squeeze lemon juice on top and season with salt and pepper (to taste). Garnish with cilantro leaves, tomatoes, and seeds.

Processing…
Success! You're on the list.

Easy Avocado Carbonara (Dairy-Free & Gluten-Free)

20 Minute Meals, Dairy-Free, Entree, Gluten-Free, Nut-Free, Soy-Free

Yes, I’ve made this three times in the last week.

Truth be told, I’ve technically never actually had traditional carbonara pasta. Seeing as it is typically made with cream and pasta, and I am dairy-free and gluten-free, odds weren’t quite in my favor. But, I imagine this avocado version is exactly what carbonara should be…if not better.

The avocado takes “creamy” to a whole new level. The egg makes the sauce fluffier (and even creamier), and the pepper ties everything together. The best part? This recipe takes max fifteen minutes. Usually when I’m hungry, I have negative patience to spend time cooking. But this avocado carbonara is so quick and so worth it. Enjoy!

Prep Time: 5 minutes
Cook Time: 10 minutes
Serves: 2 servings

Ingredients:

  • 2 servings of your favorite pasta (I’m using gluten-free Banza Cavatappi)
  • 1 ripe avocado
  • 1 egg
  • 1 1/2 tbs. nutritional yeast
  • 1 tbs. lemon juice
  • 3/4 tsp. salt (adjust to taste)
  • 1/2 tsp. black pepper (adjust to taste)
  • 1/2 tsp. garlic powder
  • Optional: Add pancetta or bacon bits for an extra savory bite!

Recipe:

  1. Cook pasta according to package directions (reserve some pasta water for later, just in case).
  2. While your pasta is cooking, add avocado, egg, nutritional yeast, lemon juice, salt, pepper, and garlic powder to a blender. Blend until creamy and well-combined.
  3. Add the avocado sauce to a medium or large saucepan and cook over very low heat for 2-3 minutes. Mix in the cooked pasta and stir for another 1-2 minutes (we don’t want to overcook and scramble the eggs). If the sauce is too thick, add in a bit of your reserved pasta water. At this point, you’re welcome to add in optional chopped pancetta or bacon.
  4. Transfer to a serving bowl. Optionally top with extra pepper and/or sliced almonds for crunch. Serve warm!

Get notified when I post a new recipe!

Spicy Chickpea Pockets (Vegan & Gluten-Free)

Dairy-Free, Entree, Gluten-Free, Nut-Free, Soy-Free, Vegan

Crispy, hearty, spicy…need I say more?

If you’re on “Cooking TikTok,” you may have seen the pan-fried spring rolls trend. This is my rendition, and I am obsessed. I was already a fan of regular spring rolls, but crispy? Sounded like heaven…

I wanted to make an Asian-inspired filling that was hearty and protein-packed. I thought about the types of dipping sauces I like with spring rolls, and sweet chili sauce popped into my head. Why not make my own sweet chili sauce and incorporate it into my filling? Enter chickpeas (and some veggies), and these spicy chickpea pockets were born. I hope you enjoy them as much as I do!

Prep Time: 30 minutes
Cook Time: 15 minutes
Serves: 6 pockets

Ingredients:

Sauce

  • 1 large clove garlic, finely chopped
  • 1/2 tsp. red chili flakes (this can be pretty spicy, so adjust to taste)
  • 1/2 tsp. salt
  • 2 tsp. apple cider vinegar
  • 4 tsp. honey
  • Optional: Make additional sauce for dipping. For the dipping sauce, halve the salt, apple cider vinegar, and honey.

Filling

  • 1 cup canned or cooked chickpeas
  • 1 medium carrot
  • 1/8 yellow onion
  • Approx. 15 stems of cilantro

Wrapper

  • 6 rice paper wrappers (about 22 cm diameter)
  • Small bowl of water

Recipe:

  1. Mix sauce ingredients together in a small bowl.
  2. Finely dice carrot and onion. Remove the stems from the cilantro, and roughly chop the leaves.
  3. In an oiled medium sauce pan, add carrots and cook for 5 minutes over low heat. Add onions, chickpeas, and sauce. Sauté over medium heat for approximately 5 minutes or until all ingredients are cooked and softened.
  4. Transfer chickpea mixture to a medium bowl. Using a fork or potato masher, mash mixture to break down chickpeas. Add cilantro and mix well.
  5. On a large plate, take a rice paper wrapper and brush water over both sides. It may take a few moments to become pliable–do not over-wet the paper (it will become too soft and rip). In the middle of the wrapper, add about 2 tablespoons of the chickpea mixture. Carefully fold the wrapper like a burrito and set off to the side. Repeat for the remaining 5 wrappers to create 6 “chickpea pockets.”
  6. Add the chickpea pockets (thickest side of the wrapper should go down first) to a well-oiled, medium sauce pan over low-medium heat. Cook until lightly browned and crispy. Flip and cook the other side until lightly browned and crispy.
  7. Serve warm!

Get notified when I post a new recipe!

Chicken Maple Meatballs (Dairy-Free & Gluten-Free)

Dairy-Free, Entree, Gluten-Free, Nut-Free, Soy-Free

This meatball just won Meatball of the Year.

I know humility is a virtue, but this meatball recipe is absolutely the Best. Meatball. Ever. I’m usually one to grab ground turkey at the grocery store, but my local market was out of ground turkey this week (shocking, I know). So, I opted for ground chicken instead. I am glad I did–and so will you, once you try this recipe.

Since it’s fall, I wanted to make something cozy, and maple syrup seemed like the way to go. I never thought I would be putting maple syrup in my meatballs, but I’m all for it. The maple syrup doesn’t make the meatballs sweet, but it adds a sort of nutty, warm flavor to the dish. Now, I’ve got leftovers for days, but I’m not complaining. Try it out–you won’t regret it!

Prep Time: 5 minutes
Cook Time: 15-20 minutes
Serves: 12-15 meatballs

Ingredients:

  • 1 lb. ground chicken
  • 1 tbs. pure maple syrup
  • 2 tsp. apple cider vinegar
  • 3/4 tsp. salt
  • 1/2 tsp. pepper
  • 1/2 tsp. oregano
  • 1/2 tsp. garlic powder

Recipe:

  1. Add all ingredients to a medium mixing bowl. Using a fork, gently mix together, trying to keep the mixture as fluffy as possible.
  2. Using two spoons, shape meatball mixture into 1.5 inch sized balls.
  3. In an oiled pan over medium-low heat, pan fry meatballs for 2-5 min on each side, or until lightly browned. Keep the lid on the pan while cooking to lock in the moisture. I fried the meatballs on three sides, allowing the meatballs to cook all the way through.
  4. Serve with your favorite pasta and sauce. I’m using my roasted red pepper sauce (recipe on the blog). Enjoy!

Get notified when I post a new recipe!

Crispy Cauliflower Tacos (Vegan & Gluten-Free)

Dairy-Free, Entree, Gluten-Free, Nut-Free, Soy-Free, Vegan

Vegan never looked so good…

Tacos are a major food group for me. Baja fish tacos, chicken tacos, chorizo tacos…and then there are the vegan tacos. Vegans really stepped up to the plate for this one. I’ve had tofu tacos, mushroom tacos, even cactus tacos. Now, enter the cauliflower tacos. Cauliflower has been turned into pizza crust, gnocchi, “steak,” and buffalo wings, so I wanted to try my hand at cauliflower tacos. They did not disappoint. Crispy on the outside, soft on the inside–need I say more? Plus, with the right toppings (don’t skip the avocado), this dish reaches a whole new level. Enjoy!

Prep Time: 15 minutes
Cook Time: 16-20 minutes
Serves: 3 servings

Ingredients:

Taco / Filling:

  • 1 head of cauliflower
  • 6 corn tortillas
  • 1 tbs. olive oil
  • 1/4 + 1/8 tsp. garlic powder
  • 1/2 tsp. chili powder
  • 1/2 + 1/8 tsp. paprika
  • 1/2 + 1/8 tsp. cumin
  • 1/2 tsp. salt

Toppings:

  • 1/4 head red cabbage, shredded
  • 1 avocado, sliced
  • Hot sauce (I love Cholula!)
  • 1 lime, juiced

Recipe:

  1. Cut cauliflower into 1-2 inch florets. Toss with olive oil, garlic powder, chili powder, paprika, cumin, and salt.
  2. In an air fryer, fry cauliflower in batches such that the florets just cover the bottom of the fryer. Cook at 400° Fahrenheit for 8-10 minutes or until browned and cooked through.
  3. Heat tortillas in pan over low heat until warm and pliable.
  4. Add cauliflower and toppings to tortilla. Enjoy!

Get notified when I post a new recipe!

Easy Grilled Chicken (Dairy-Free & Gluten-Free)

20 Minute Meals, Dairy-Free, Entree, Gluten-Free, Nut-Free, Soy-Free

Juicy summer chicken!

This recipe is required for your next summer barbecue! The dry rub only consists of four ingredients, and it brings a great Latin American twist. Inspired by my go-to taco seasoning, the blend of cumin, chili powder, and paprika makes this a quintessential grilling dish. The char that this chicken gets is beautiful and delicious. Plus, the entire process is quick and easy, so you don’t have to miss out on any of your party’s fun! Toss the chicken on the grill, set a timer, grab a drink, and enjoy!

Prep Time: 2 minutes
Cook Time: 18 minutes
Serves: 2 people

Ingredients:

  • 1 lb. chicken tenders
  • 1 tsp. olive oil
  • 1/4 tsp. chili powder (adjust to taste)
  • 1/4 tsp. paprika (adjust to taste)
  • Pinch of cumin
  • Pinch of salt

Recipe:

  1. Heat grill to 400-450° Fahrenheit.
  2. Brush olive oil on both sides of the chicken.
  3. Sprinkle one side with cumin, chili powder, paprika, and salt. Place chicken rub-side down on the grill. Close the grill cover and let cook for 10 minutes.
  4. Sprinkle another pinch of chili powder, paprika, cumin, and salt on the face-up side of the chicken. Flip the chicken and close the grill cover. Let cook for 8 minutes.
  5. Remove chicken from the heat and let sit for 5-10 minutes. This will allow the chicken to continue cooking. Enjoy!

Get notified when I post a new recipe!

Baked Hummus Pasta (Vegan & Gluten-Free)

Dairy-Free, Entree, Gluten-Free, Nut-Free, Soy-Free, Vegan

Yes, hummus pasta.

You may have seen the viral “baked feta pasta” that has been taking over TikTok. People have been going crazy over baking a block of feta cheese with cherry tomatoes, and then mixing it all together into a pasta sauce. Because I’m dairy-free, I opted for the vegan version of this dish: baked hummus pasta. The hummus and tomatoes add a great tanginess, elevated by the great roasted flavor from baking. It is SO easy to make and SO good.

Prep Time: 5 minutes
Cook Time: 35 minutes
Serves: 2 servings

Ingredients:

  • 2 servings dry pasta
  • 1 1/2 cup cherry tomatoes
  • 1/2 cup hummus
  • 3 cloves garlic
  • 1 tsp. olive oil
  • 1/8 tsp. pepper
  • 1/8 tsp. oregano
  • Pinch of salt (adjust to taste)
  • Squeeze of lemon (optional)
  • Sprig of fresh basil (optional)

Recipe:

Preparation

  1. Preheat oven to 375° Fahrenheit.
  2. Place tomatoes and garlic in a medium glass baking dish. Toss with olive oil.
  3. Dollop hummus into center of dish and sprinkle with pepper and oregano.

Cooking

  1. Bake for 35 minutes, or until tomatoes blister.
  2. Cook pasta according to the box’s directions.
  3. Using the back of a fork, crush tomatoes and garlic. Mix together with the hummus until a creamy sauce forms.
  4. Add salt and lemon juice to taste. Mix the pasta into the sauce and optionally garnish with basil.

Get notified when I post a new recipe!

Easy Grilled Asparagus (Vegan & Gluten-Free)

20 Minute Meals, Appetizer, Dairy-Free, Gluten-Free, Nut-Free, Soy-Free, Vegan

Grill Master Level: Unlocked

Summer means barbecue season is upon us! Asparagus is one of my favorite ingredients to grill. Not that pan-frying or baking is boring, but the fire from the barbecue brings out asparagus’ flavor and texture in a whole new way. Plus, with a squeeze of lemon, this asparagus recipe just screams summer.

Cook Time: 7-10 minutes
Serves: 2 servings

Ingredients:

  • 1 bunch of asparagus
  • 1 tsp. olive oil
  • Pinch of salt (adjust to taste)
  • Pinch of pepper (adjust to taste)
  • 1 tsp. fresh lemon juice (adjust to taste)
  • Trader Joe’s “Everything but the Bagel Seasoning” (optional)

Recipe:

  1. Fire up grill to a low heat.
  2. Toss asparagus in olive oil.
  3. Using tongs, carefully place asparagus horizontally across the grill ridges to avoid the asparagus falling through the cracks.
  4. Cover the grill and let cook for 7-10 minutes or until lightly charred.
  5. Remove asparagus from the heat and toss in salt and pepper. Add a squeeze of lemon and dash of “Everything but the Bagel Seasoning” over top. Enjoy!

Get notified when I post a new recipe!

Honey Miso Salmon (Dairy-Free & Gluten-Free)

20 Minute Meals, Dairy-Free, Entree, Gluten-Free, Nut-Free, Soy-Free

Easiest salmon ever.

This recipe is a powerhouse of healthy ingredients—and you only need five! With salmon, we’re getting a great source of protein and omega-3 fatty acids. With honey, we get a load of antioxidants. With miso, which is made of fermented soybeans, we’re packing in the probiotics and vitamins. But, science aside, this recipe is just too delicious not to try. You can make salmon so many different ways, but I love the Asian twist on this. If you don’t know what umami tastes like (umami is the “fifth” taste outside of sweet, salty, sour, and bitter), you’ll definitely get it with this savory miso.

Prep Time: 5 minutes
Cook Time: 12-18 minutes
Serves: 2-3 fillets

Ingredients:

  • 12-16 oz. of salmon (2-3 fillets)
  • 1 tbs. honey
  • 1 tbs. white miso
  • 2 tbs. coconut aminos
  • 1 clove garlic, finely diced

Recipe:

  1. Preheat oven to 400° Fahrenheit.
  2. In a small bowl, mix together honey, miso, coconut aminos, and garlic. Reserve 1 tbs. of the glaze for topping.
  3. Place salmon skin-down on a lined or oiled baking pan. Brush glaze over the top.
  4. Bake for 12-18 minutes, depending on your desired level of “doneness.” For reference, 15 minutes cooked my salmon to a medium level.
  5. Drizzle the reserved glaze over the salmon and enjoy!

Get notified when I post a new recipe!